How To Paint - Aftermath Grumple
- Chris Bowler
- Feb 19, 2021
- 4 min read

Here's a quick tutorial on how I painted the hero Grumple for Aftermath. You can find tutorials for the other heroes as well as the minions here.
Recipe
Formula P3 Battlefield Brown
Formula P3 Gun Corps Brown
Formula P3 Meaty Ochre
Formula P3 Menoth White Base
Formula P3 Menoth White Highlight
Formula P3 Moldy Ochre
Formula P3 Khardic Flesh
Formula P3 Midlund Flesh
Formula P3 Ryn Flesh
Formula P3 Ironhull Grey
Formula P3 Underbelly Blue
Formula P3 Frostbite
Formula P3 Morrow White
Formula P3 Bloodtracker Brown
Formula P3 Bogrin Brown
Formula P3 Jack Bone
Citadel Contrast Snakebite Leather
Citadel Contrast Gore Grunta Fur
Citadel Contrast Black Templar
Green Stuff World Mojave Mudcrack
Method
I began with a base coat of Battlefield Brown across the whole mini...

Next I want to create a gradated base colour, here I'm trying to leave the recesses dark and build up a lighter colour in the higher areas and especially around the face. This will act as a base coat for the texture that comes later.
While the Battlefield Brown is still wet I brush on some Gun Corps Brown and then working quickly add layers of Meaty Ochre and then Menoth White base without really cleaning the brush in between. To get the final stage I clean the paint off the brush and then do a drybrush coat with just the Menoth White Base around the face.


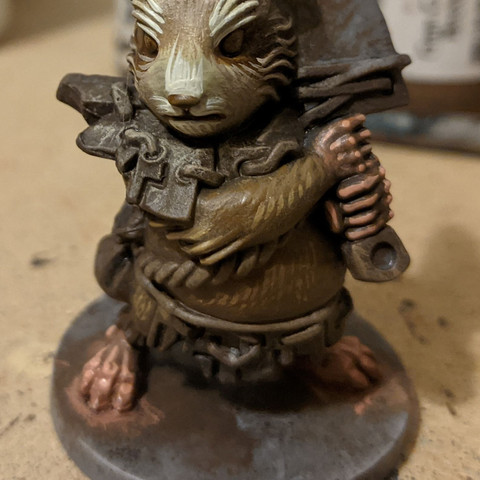
Next it was time for the markings on the face. I began by marking out, roughly where I wanted the lighter markings. I'm using a fine brush to create a fur like texture by painting thin lines and following the contours of the face. I start with a layer of Menoth White Base. Next I add some Gun Corps Brown to the mix and do downward strokes from the top of the head. Then, using Snakebite Leather Contrast I mark in the dark areas around the eyes, the nose and the mouth.


Then it's time for the highlights using Menoth White Highlight. I add in the eyebrows, nose and mouth, continuing to use lots of thin strokes to build up texture, while also defining the shape of the facial features. Lastly I blend between the darkest and lightest colours by painting fur using a mix of Gun Corps and Menoth White Base.


Now to move on the to the rest of the fur. For this I used Gun Corps brown but I wanted to add bit more warmth to the mix to I added a dash of Moldy Ochre. Each successive pass I added more Moldy Ochre and covered less of the mini with the texture.


Now it's time for the hands and feet. I began with a layer of Khardic Flesh, then Midlund Flesh, followed by a highlight of Ryn Flesh, focusing in the knuckles, edges of the fingers and other ridges in the hands and feet. Then to blend the layers together I added a wash of Ryn Flesh and Contrast medium over the backs of the hands and tops of the feet. The claws were then added in in Menoth White Highlight.


Next I blocked out all the metallic parts with a nice dark basecoat, here I'm using Ironhull Grey.

Then it was time for some non-metallic metal on the knife blade. I'm aiming for a lighter coloured blade as this is supposed to be a kitchen knife. So I start by painting most of the blade with a mix of Ironhull and Underbelly Blue, before switching to my drybrush for a coat of Underbelly Blue and a then one of Frostbite. The goal is a lighter colour along the edge of the knife and towards the tip however it should be deliberately patchy in places. The last stage is to define the reflections and shadows. I use white to pick out the edges of the blade as well as add a large patch of reflection about two thirds of the way up. Then I thin down some Ironhull Grey to add some shadows around the face towards the handle.


With the metal plates I'm following the same technique but with more of a contrast. I am imagining the light is hitting the models right shoulder and then painting the edges of the plates that would be lit, while leaving the base coat in the recessed shadows. I first cover around 50% of the plates with Underbelly Blue, then highlight the lit edge with Frostbite before adding in some light reflections with white.


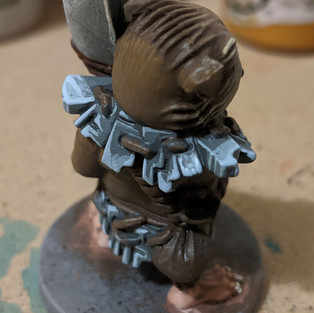


To finish off we have the leather and the rope. I used a wash of Gore Grunta Fur to tint all the straps and the pouch before highlighting with Blood Tracker Brown and then a dash of Bogrin Brown.


For the rope I used Jack Bone and just like we did with the fur I'm using a fine detail brush and painting strands of rope texture. I added some white to the mix and then added some more texture to just the top most part of the rope.


To finish the mini, I washed the blade handle with Black Templar Contrast. Then I added some Ironhull grey to the inset stud, before adding a dash of white for a highlight. I also added a dot of light reflection to the eyes. The mini was then based using Battlefield Brown and Mojave Mudcrack.


You can find more tutorials on how I painted my Aftermath minis here. Until next time, have fun painting...
The Duke


Comments