How to Paint - Aftermath Rustlord
- Chris Bowler
- Feb 26, 2021
- 4 min read

Here's a quick tutorial on how I painted the boss, Rustlord, for Aftermath. You can find tutorials for the other bosses as well as the heroes & minions here.
Recipe
Citadel Contrast - Flesh Tearers Red
Citadel Contrast - Basilicanum Grey
Citadel Contrast - Gore Grunta Fur
Citadel Contrast - Snakebite Leather
Citadel Contrast - Blood Angels Red
Citadel Contrast - Space Wolves Grey
Citadel Contrast - Black Templar
Citadel - Runefang Silver
Formula P3 - Ironhull Grey
Formula P3 - Morrow White
Formula P3 - Khador Red Base
Formula P3 - Khador Red Highlight
Formula P3 - Bogrin Brown
Formula P3 - Meaty Ochre
Formula P3 - Moldy Ochre
Formula P3 - Bastion Grey
Formula P3 - Bloodtracker Brown
Formula P3 - Coal Black
Formula P3 - Gravedigger Denim
Formula P3 - Jack Bone
Formula P3 - Menoth White Highlight
Formula P3 - Sanguine Highlight
Formula P3 - Underbelly Blue
Formula P3 - Frostbite
Formula P3 - Battlefield Brown
Forgeworld - Aged Rust
Green Stuff World - Mojave Mudcrack
Method
Rustlord is a big miniature with a lot of metal which can be intimidating, however when he's finished his size will give great table presence. I began with a coat of Ironhull Grey everywhere except the casing for the pen knife which was done with Runefang Silver.

Next I laid down some colours and shading. I used Flesh Tearers Red for the pen knife, Basilicanum Grey on all the armour, except the soup can, Gore Grunta Fur on the belt and Snakebite Leather for the teeth.

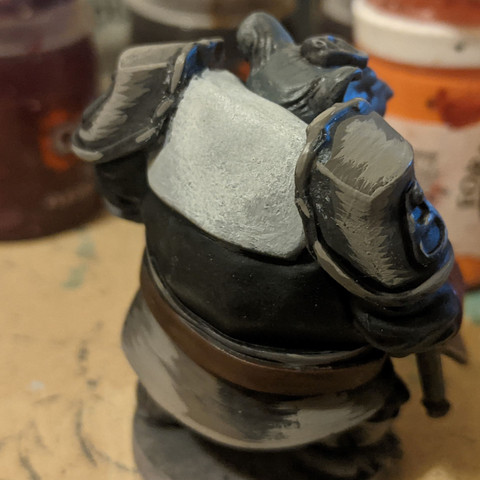
Time for the soup can armour. I began by mixing Ironhull Grey & Morrow White and applied a flat coat to all the armour, defining the shape of the piece and leaving a little grey in the shadows. Adding progressively more white to the mix I continued to lighten the armour. Lastly I used pure white and my small drybrush to add a bright patch right in the centre.


Now to add the red. I used a wash of Blood Angels Red. making sure to use a fine detail brush to define the edge. During this time in particular I would reference the art often to see where to apply the paint. I added a highlight in Khador Red Base, this will even out any inconsistencies in the wash, before sparingly adding highlights with Khador Red Highlight such as around the collar.


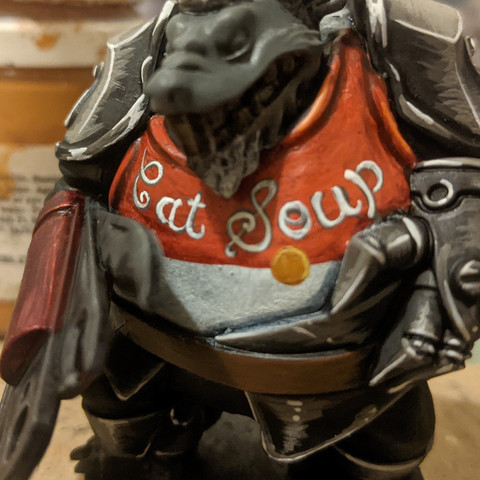
There's no shortcut or magic trick that can help with next part, the freehand lettering. I begin by "sketching out" the letters with Bastion Grey, this gives me a guide for when I add in the white that I can paint over. You want to make each of the lower case letters roughly the same size, that will help with the overall finish.


For the seal I painted a small circle centred on the divide between the red and white in Bogrin Brown, adding a highlight to roughly half of it with Meaty Ochre, before giving an edge highlight in Moldy Ochre.

Next it was time for the armour. I'm going to be using a nonmetallic metal look, but you could achieve a good look quickly with washes. Base with any silver, wash with Basilicanum Grey and then add some edge highlights with silver again.
For my version I used Bastion Grey. You'll see I worked in rough streaks, because I wanted the armour to have a dark, beaten up look to it. As I work I'm rotating the model in the light looking for the areas the light hits and then painting those.


Once I've roughed in the grey I add more light reflection with a mix of Bastion Grey & Morrow White.


Before adding the final reflections and edge highlights with Morrow White.


To neaten up the area where the armour and the soup can meet I washed the shadows with a little Space Wolves Grey. Next I painted the flats of belt with Bloodtracker Brown, adding in highlights with a mix of Bloodtracker & Bogrin again, looking for where the light would naturally strike the model. I then finished by defining the edges with some Bogrin Brown.


The shirt and pants I painted with Coal Black and highlighted with Gravedigger Denim, which I admit is pretty hard to see in these photos but trust me, I did.


Which the bulk of the mini done it's time to work on the face. I began with blocking in all the colours. I used Jack Bone for the teeth, Sanguine Highlight for the nose and ears and Black Templar for the eyes.

I then added edge highlights to the teeth with Menoth White Highlight and a dot of Morrow White to each eye as a reflection.

For the fur I used a mix of Ironhull Grey & Morrow White, painting streaks as fur and using the contours of the face as a guide as to where that fur would go. I added more white to the mix before going in for a second highlight.


The ears and the nose were highlighted with a mix of Sanguine Highlight & Morrow White where I was concentrating on the angular shapes, making the most of the edges.

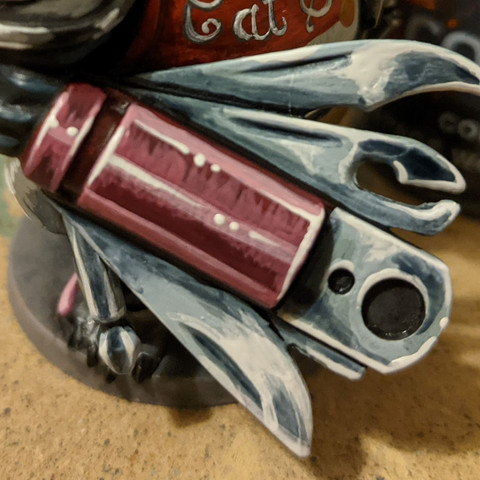
For the blades of the pen knife I wanted a very different metallic look. I began with a base of Underbelly Blue before adding in a highlight across roughly 70% of the blade with Frostbite. I then added a white highlight on around 10% of the blade, painting it so that the light was striking the blades roughly in a line. Finally I added some dark reflections with Space Wolves Grey which helps the white stand out even more.


I initially planned to leave the pen knife as it was but in the end I wanted it to have a higher shine. I first added a coat of Sanguine Highlight across all the flats, leaving the groove the original colour. Then mixing up some Sanguine Highlight & Morrow White I added some light reflections to the edges and the centre. Adding in more white I defined those reflections further, before adding some spots of white for a glossy light reflection.


The boss is called Rustlord so it stands to reason he should have some rust spots. For this I used Aged Rust weathering powder. I didn't want to completely erase the paint work though so I added small patches of rust to each area. With weathering powders a little goes a long way. Simply brush it on and voilá, instant rust.


To finish I painted the base with Battlefield Brown and once dry added a layer of Mojave Mudjack.


You can find more tutorials on how I painted my Aftermath minis here. Until next time, have fun painting...
The Duke


Comments