How to Paint - Aftermath Smokey
- Chris Bowler
- Feb 26, 2021
- 4 min read

Here's a quick tutorial on how I painted the boss Smokey, for Aftermath. You can find tutorials for the other bosses as well as the heroes & minions here.
Recipe
Formula P3 - Thamar Black
Formula P3 - Ironhull Grey
Formula P3 - Morrow White
Formula P3 - Gravedigger Denim
Formula P3 - Trollblood Highlight
Formula P3 - Menoth White Highlight
Formula P3 - Sanguine Highlight
Formula P3 - Meaty Ochre
Formula P3 - Sulfuric Yellow
Formula P3 - Jack Bone
Formula P3 - Battlefield Brown
Citadel Contrast - Black Templar
Citadel Contrast - Nazdreg Yellow
Citadel Contrast - Basilicanum Grey
Citadel Ardcoat
Green Stuff World - Mojave Mudcrack
Method
90% of this tutorial is going to be spent on Smokey's face, because honestly, for his fur it's simple dry brushing. I began with a base of Thamar Black, normally I avoid true black but in this case I wanted a really dark finish to the shadows in Smokey's fur. After that I set to drybrushing.

For this I'm using a large drybrush and Ironhull Grey. For me I like to make sure my brush is nice and supple, I usually keep my drybrushes in my water pot all year round. Then I dry it out on paper towel until it's nice and dry but soft like a makeup brush. I add a small amount of paint and then rub the brush back and forth on something (usually my hand) until the brush is leaving only a small amount of paint behind, then I start applying it to the miniature.

With the first pass I'm looking to hit most of the fur, but leaving the paws largely untouched. I then add some Morrow White to my Ironhull Grey and go again. If the brush begins to feel sticky as the paint builds up I wash it and dry it until it flows across the model without resistance. I do a couple of passes, each time concentarting my strokes higher and adding a little more white for each pass.


The final pass is almost pure Morrow White, this time I'm looking to add some extreme highlights to the fur along the back, top of the head and along the edges of the muscle blocks.

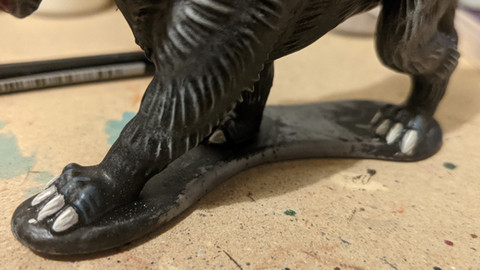
I added a simple edge highlight to the toes in Gravedigger Denim and based the claws with Trollblood Highlight before adding some streaks of Menoth White Highlight to give the impression of texture.


And that's the majority of Smokey done, the rest of the time was spent on the face. We begin with some base colours, Sanguine Highlight for the nose and mouth and Meaty Ochre for the eyes. As with all base colours we're looking to define the area, then we will build up shape and texture with highlights.

For the eyes I began with a layer of Sulfuric Yellow and throughout this process I referred to the card art for direction. I then added an elliptical area of Meaty Ochre to the centre of each eye. Mixing up some Sulfuric Yellow & Morrow White I added a highlight to the bottom half of the eye, before using Black Templar Contrast to add in the pupils. I use Contrast paints for details like this because they flow and cover nicely without need for thinning. I'm using a fine detail brush to get as sharp an edge as I can.


Next I add in a light reflection with some Morrow White but there's not enough depths to the eyes for my liking yet. So I add a glaze of Nazdreg Yellow, this has the effect of deepening all the colours but also tying them together a little more closely. Looking at the art again I notice there is a lighter yellow highlight around the pupil, so using my fine detail brush and a mix of Sulfuric Yellow & Morrow White I pick out the edges of the pupil. To finish off I add my white reflections back in and then add a layer of Citadel Ardcoat for a real glossy shine.


Happy with the eyes I move on to the mouth. Using a mix of Sanguine Highlight & Morrow White I pick out the nose and tongue, using Jack Bone to pick out and define the shape of the teeth. Adding more Morrow White to my pink mix I do a second highlight on the nose and tongue, refining the edges, doing the same for the teeth with Menoth White Highlight.


To finish the face I need to add a little definition around the eyes, nose and mouth, it looks a little scrappy with just the drybrushing. I use a mix of Ironhull Grey & Morrow White and a fine detail brush to smooth out the drybrushing and add some sharp edges to the features.

It's at this point I noticed I missed out the ears, so I mixed up some more Sanguine Highlight & Morrow White and painted them the exact same way as the nose and tongue this time the most extreme highlights are towards the back edge of the ear.

To finish off I added some shading to the fur using Basilicanum Grey. I'm just looking to add a little bit of depth in the darker recesses, such as the creases between the legs and the chest as well as to those lines between the fur which appear almost like stripes.

Smokey was then finished with a layer of Battlefield Brown on the base and once that was dry a layer of Mojave Mudcrack.

And that concludes my tutorials for Aftermath, if you have enjoyed these or found them useful please consider leaving a comment down below letting me know what you liked and how I can improve things in the future.

You can find more tutorials on how I painted my Aftermath minis here. Until next time, have fun painting...
The Duke


Comments