How to Paint: Wyrm
- Chris Bowler
- Jan 15, 2021
- 4 min read

Updated: May 9, 2021
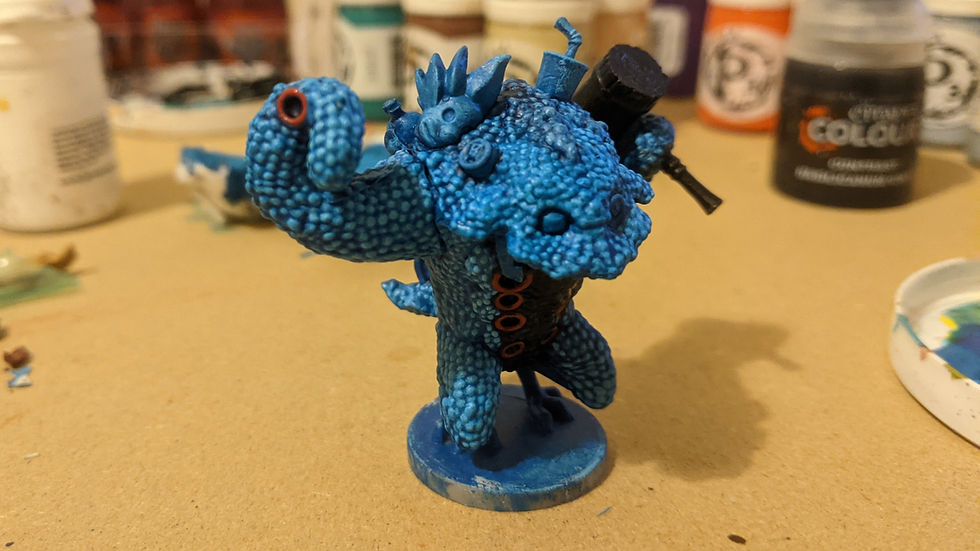
Wyrm was a surprise, appearing as one of the final stretch goals in the City Fall Kickstarter. No one was expecting him, he's a fringe character, a creature composed entirely of sentient flatworms with a distaste for humans, still it's an interesting sculpt that I was intrigued to get my brushes on. Here's how I painted TMNT's Wyrm...
Recipe
Formula P3 Underbelly Blue
Formula P3 Frostbite
Formula P3 Cygnar Blue Highlight
Formula P3 Ironhull Grey
Formula P3 Skorne Red
Formula P3 Khador Red Base
Formula P3 Khador Red Highlight
Formula P3 Inferno Orange
Formula P3 Meaty Ochre
Formula P3 Heartfire
Formula P3 Carnal Pink
Formula P3 Bogrin Brown
Formula P3 Gun Corps Brown
Formula P3 Trollblood Highlight
Formula P3 Rucksack Tan
Formula P3 Sulfuric Yellow
Citadel Runefang Steel
Citadel Auric Gold
Citadel Blood for the Blood God
Citadel Contrast Talassar Blue
Citadel Contrast Ultramarines Blue
Citadel Contrast Templar Black
Citadel Contrast Gryph-hound Orange
Citadel Contrast Medium
Coat D'Arms Matt Varnish
Method
I began as always with a light basecoat, in this case Underbelly Blue, before washing the entire model with a mix of Talassar Blue Contrast and Cygnar Blue Highlight.

Then adding some Frostbite to the mix I hit the whole mini with my drybrush adding several layers of increasingly lighter colour to get a nice contrast between the light and the shadows, this will help with the glazes later.

Next I picked out each of the individual dots by adding white to the mix. Not going to lie, this step took around 45 minutes but it's worth it because in the end it gives you a more defined look than just drybrushing.

Next I added Black Templar Contrast to the underbelly.

Next I used Talassar Blue and Ultramarines Blue to glaze the mini. The bulk of the mini was washed with the Talassar, with the Ultramarines blue being used to create shadows, such as under the arms or around the objects. I used Contrast Medium to thin the washes and stop them pooling too heavily, I am mainly aiming to tint the base colours without overdoing the shadows.

I washed the mallet with some Wyldwood Contast and then set to painting the suckers, for this I used Skorne Red.
I then added some Khador Red base to the upper right and lower left of the suckers as a highlight, adding Khador Red Highlight after that to the centre of each highlight section.

With that done it was time to start picking out the various objects. The mask and the cup were picked out with Frostbite. The cans and bottles with Ironhull Grey and Skorne Red and the handlebars and ball with a mix of Carnal Pink and Skorne Red.


The bike was finished with a couple of layers of Carnal Pink on the handle bars, adding white to the pink for the final highlight. The same colours were used for the ball on the front of the model. The handlebars and the spokes were picked out with Runefang Steel. The wheel was done with Black Templar Contrast.

The coke bottle has a highlight of Khador Red Base on the label before freehanding in some lettering in white. The plastic was done with a mix of Ironhull and Frostbite, followed by a highlight of pure Frostbite before adding a light reflection in White.

Using Inferno Orange I picked out the clowns hair and the cup. I've also added Runefang Steel to the cans and highlighted the red with Khador Red Base.

The orange was then highlighted with Heartfire. The mask was highlighted with a mix of Frostbite and White. The lips were washed with Talassar Blue and then highlighted with a mix of Talassar Blue and white. The nose was done with Skorne Red, highlighted with a mix of Skorne Red and White. The eyes and eyebrows were then done using Templar Black Contrast and a very thin brush.

The crest was then hit with a coat of Meaty Ochre...

Followed by Heartfire being used to pick out each of the dots, just like we did with the blue.

Rucksack tan was used to pick out the other eye before using Sulfuric Yellow as a highlight. Ironhull Grey was used for the teeth, highlighted with Runefang steel and a then an edge highlight of white. Gun Corpse Brown was used for the edges of the mouth, with white added to the mix for an edge highlight.

The Mallet was highlighted using Bogrin Brown and Meaty Ochre adding in a wood grain texture as I went. Auric Armour was used for the gold banding and Trollblood Highlight was used for the grip with white mixed in for a highlight.

The crest was then washed using a thinned Gryph-Hound Orange wash, again I was looking to tint the base coat and more evenly match the highlights and low lights so I used plenty of medium to keep the wash as thin as possible.

I added some Black Templar Contrast to the toes. Lastly I added some comic blood splats to the mallet using Blood for the Blood God. To add a little sheen to the finished mini I added a very thin coat of Matt Varnish to all of the skin, this gives the impression of a slimy look without being overly glossy.


And there we have it, another TMNT mini finished. Until next time, have fun paining!
The Duke


Really love this creative walkthrough , the way you break down the painting process makes it feel both fun and inspiring! 🎨✨ And for those who enjoy bold, expressive style in their everyday wardrobe, an aviator vest adds rugged character and timeless flair to any look, perfect for layering with attitude.